rev. 0.1 – 26 Sep 2017 == alpha / work in progress ==
Der Selectrix-Bus ist bei Längen im Bereich von mehr als 20 Meter nicht immer mehr stabil (zumindest bei der gewachsenen Verdrahtung bei uns im Klub) – darum habe ich mal einmal nach Alternativen umgeschaut, die man einfach mit dem Selectrix Bus verbinden kann.
Was ich auf jeden Fall dabei nicht aufgeben möchte, ist:
1) das einfache Konzept des SX-Systems: 112 Kanäle (Adressen), jeweils mit 8 Bit, thats it!
2) Arduinobasierende Module zum Schalten von Weichen, Signalen und als Sensoren für die Belegtmeldung
TODO: noch zu übersetzen =============
TODO: Foto Upload ====================
TODO: add links
In more detail I tried to get more understanding of both LocoNet (TODO LINK) and CBUS (TODO LINK) . (the DCC system in general does not really match the requeirements because it is not bidirectional, you cannot hook up TOTIs to DCC without having a second bus system like S88 or Lenz RS)
LocoNet
It turned out, that Arduino modules for the loconet are quite easy to develop, all the software is available in a very nice library „LocoNet“ ! (for details and projects see https://github.com/michael71/LocoNetProjects ) A major advantage of LocoNet is (for me) the existance of a very nice modular panel for LocoNet, manufactured by Uhlenbrock. This panel is easy to use and doesn‘t require any computer programming, just some graphical configuration. However,
1) it is a bit on the expensive side
2) and the LocoNet logic does not have much in common with Selectrix, it is „DCC centric“ (of course)
3) LocoNet is not really on open system – there is a lot of documentation available, but reading the licence terms (even the one of the open source project „Arduino LocoNet library“) discouraged me.
(? 4) LocoNet projects with Arduino require additional analog hardware. )
CBUS
CBUS uses the CAN-BUS for transmitting its data, which is an excellent choice given the robustness of the CAN-BUS. There are the cheap interface chips available as well as interface boards and libraries for both the Aduino and the RaspberryPI. I’m a member of “MERG”, the (mainly) UK group who invented CBUS, therefor I had a look onto this system for some years now and have built some of the MERG modules. But I was always overwhelmed by the complexity of the system (including two modes of operation, SLIM and FLIM) – or maybe I just had not enough patience to really dive into this complexity – although I made my own Arduino “CBUS monitor”, see (oscale.net/cbus).
On the plus side there are really a lot of inexpensive CBUS modules available through MERG and excellent support is available in the MERG forum (+ tutorials and workshops (in UK)). But the configuration of my test system was quite some work – lots of events need to be created and some modules are not easy to configure. And, last but not least, for an “Arduino guy” the start into CBUS was hard, because all the MERG modules are based on PIC controllers …
In the meantime “amaurial” has made a nice Arduino lib, which makes building arduino based modules easier, but (just like the CBUS features) the library is pretty complex.
SimpleCAN (SX-CAN)
Therefore in the end I decided to build a simple “Selectrix type” system (i.e. address based, 8bit based) which can use both Selectrix hardware (i.e. the old modules on our club layout) and newer CAN-bus connected modules. It is meant for small to medium size layouts (with a limited number of addresses).
SimpleCAN principles of operation
Selectrix uses 112 channels with 8 bit information each => mapped to Simple-CAN addresses and data bytes (can be extended to 128…254 = pure CAN channels)
These 8 bits are always grouped together – which makes configuration easy. There is no need to generate 8 different events because you normally use such a channel for either 8 turnouts, a loco, or a few signals. (the “consumers”)
For each channel there are also “producers” like loco throttles or encoders connected to push button groups or a panel.
SimpleCAN OP-Codes and Message – DRAFT
Layout Operation
| OP Code | hex | Data(bytes) | Prio | Comment |
|---|---|---|---|---|
| OPC_SX_SET | 0x31 | SX-Channel SX-Data | med. | |
| OPC_SX_REQ | 0x32 | SX-Channel | med. | |
| OPC_SX_LOCO | 0x33 | SX-Channel SX-Data | high | higher prio for loco control |
Setting/Reading module variables
| OP Code | hex | Data(bytes) | Prio | Comment |
|---|---|---|---|---|
| OPC_NV_REQ | 0x41 | module# | low | module# must be unique |
| OPC_NV_ACT | 0x42 | module# Var1 (opt. Var2 Var3 …. Var7) | low | feedback from module |
| OPC_NV_SET | 0x43 | module# Var1 (opt. Var2 Var3 …. Var7) | low | sent to module (=write) |
standard module variables (1 byte each, 0..255)
| Var# | description | data range | Comment |
|---|---|---|---|
| 1 | CAN id | 0..127 | used for transmission (PC/canID = 0) |
| 2 | SX-channel of module | 1..112 | |
| 3 | module type | 1..254 | module hardware identifier |
| 4 | mod. specific variable | 0..255 | for example software revision |
| 5 | mod. specific variable | 0..255 | for example toti delay time |
| 6 | mod. specific variable | 0..255 | … |
| 7 | mod. specific variable | 0..255 | … |
preliminary comments
- Module# = 255 for new modules, i.e. “EEPROM not set”)
- as usual (with Selectrix), Power (0=off or 80=on) is sent in channel 127 (dec)
from the datasheet of the MCP 2551 (CAN Transceiver, used in most arduino can-bus projects
MAXIMUM NUMBER OF NODES
The MCP2551 CAN outputs will drive a minimum load of 45 Ω, allowing  a  maximum  of  112 nodes  to  be connected (given a  minimum differential input resistance of 20 kΩ  and a nominal termination resistor value of 120 Ω).
112 – identical to the number of Selectrix channels …. what a remarkable conincidence -:)
Hardware
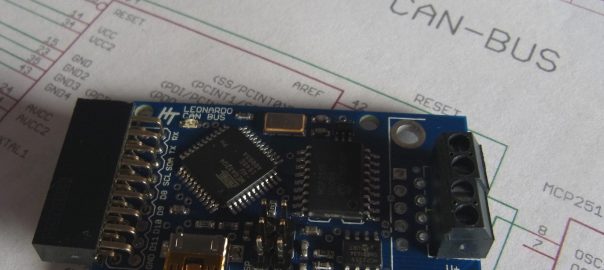
For the standard Arduino there are several CAN-Bus shields available – enough for making the first test setups. However, I wanted to have a test board similar to the Selectrix „Basis“ boards (which utilize a compact Arduino Pro Mini) and found a nice CAN-Arduino at the hobbytronics shop in the UK. It is not much larger than the Arduino Pro Mini.
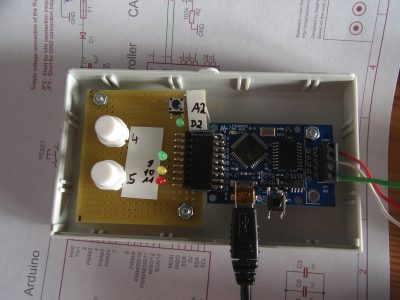
A Leonardo CAN-can test-board:

another test board, based on Watterott’s CANdiy shield
TODO

… more to come …
